Showing posts with label care. Show all posts

Monday, June 10, 2013

Pretty Garden Markers

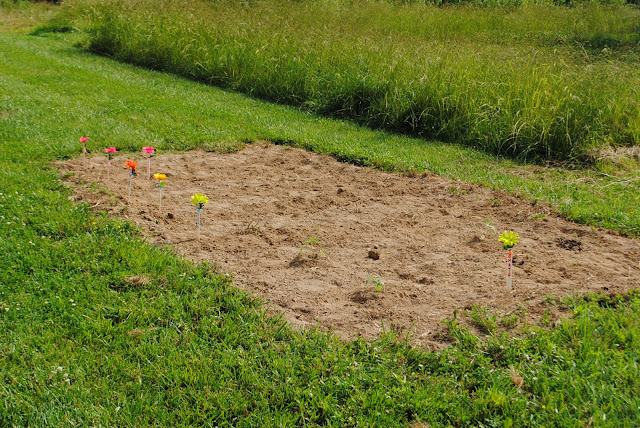
We planted seeds at the garden last week and with all the interest in digging in the dirt I figured we needed to mark where it is not ok to dig until the plants come up making it more obvious.
 
I grabbed some quick supplies and we started working on our markers.  We used paint stir sticks, faux flowers, pipe cleaners and markers.  We made a marker for each row writing each veggie on a marker with a marker.  Then we cut flowers and pipe cleaners, held a flower stem to a stir stick and twisted the pipe cleaner around the stick to hold the flower in place.  Lastly, we went outside and used a hammer to push the sticks into the ground at the front of each row. 
Super Simple.  Super cute.  Super effective!


Thursday, June 6, 2013

Little DC Garden

My little friends and I have really been having fun playing in the dirt this week.  ON Sunday, Shaun and I drove down with the tiller in tow and tilled up our garden spot at the day care.  On Monday I broke out my dc hoe and rake and also little kiddie garden gloves and hand tools donated by my loving Mother.  The kids were all about the gloves and tools and dug and played.  We have been out there every day this week.  We finally planted our seeds on Wednesday. 
 
This year we are growing corn, watermelon, squash, zucchini, green beans and tomatoes.  The green beans in the dc garden are new this year.  We frequently have green beans with our lunches so I thought it would be neat for them to watch them grow. 
 
Now we will water a little and wait for the plants to come up.  Then we will begin our weeding.  I also used the side of our storage barn to hang our tools where they are protected by the roof overhang from the rain and sun.  Makes garden life a lot easier not having to tote all those accessories!


Monday, May 13, 2013

Library Surprise

I usually go to the library on Saturdays.  I love to pick out new books for story time at the day care.  This past Saturday I went to the library, as usual, and ran into a big surprise.  I returned my previously checked out books and picked up my books that were on the hold shelf.  When I turned around to head to the children's area I saw a room full of books and people in the glass conference room.  I know my eyes got as big as dinner plates and I asked the fellow behind the desk if it was a book sale.  He said yes and that it was the last day for it.  In fact, it was in the midst of it's last hour!  I went inside and the lady working handed me a grocery sack and said "all the books it will hold will be four dollars."  Yippee!  I made my way to the children's section first and began looking and stuffing!  I wound up with a nice stack of books for story time.  Some of the books are vintage and some look newer.  Some of them I remember from being a kid and one of them especially.  It came from the library in the elementary school next to the library where I attended school.  I immediately opened the book and gave it a sniff and it smelled just as I remembered the books in that library smelled.  Flashback!  I also picked up a few books for me from the juvenile reader's section and fiction and non-fiction.  I had a blast.  Here's a look at our new stash.


I love this last book, Once Upon A Rhyme."  I read some of it out loud at the bus stop the other morning.  If it was checked out it would have a high rating.

Friday, May 10, 2013

BackYard Bird Bingo

I am a bird watcher.  I have always loved paying attention to birds that I see and hear in our area or where ever I go.  A bird is something a child is going to ask about and it is good for them to notice what is flying around them.  We talk about the differences in them, we have feeders during the winter time and even had a Robin nest in our tiny new tree last year in the back yard here. 

I came up with this bird I.D. game that I call "Backyard Bird Bingo" and it includes the most common birds that we see around the day care.  I made three different cards with some of the same birds on them.  You can print them out using a color printer and get ready to get your chairs out in a shady place in the yard to start watching.  The kids can use rocks to place on their cards when they see one of the birds.  Or you can use a crayon to cross through the picture when the bird is seen. 

You are welcome to right click and print the following pictures.  If you have trouble, please send me an email and I will send the pdf file to you.


I have to admit that I ued pictures that I found through yahoo search.  I didn't think ahead of time to give credit to each site for their drawing but will not take credit for the drawings themselves for this project.  Thanks.

Monday, April 22, 2013

Opposites

Lately we have been talking a lot about opposites.  The difference between Hot and Cold, Soft and Hard, and Wet and Dry.  I haven't made a board for the wet/dry yet.  We mainly talk about that one in the sand box and at the dirt pile.  Sand is a good way to show wet and dry because sand will run out of your hand when it is dry and just sit there when it is wet.  Even though the kids already know pretty much when something is hot or cold I believe it teaches the differences in things and also defining words for objects.

For examples on the Soft/Dry board, we talked and came up with suggestions for each then looked for things that applied.  We found feathers from the geese outside and a got a rock from our collection. 

For the board on Hot and Cold, I resorted to the internet for pictures I could cut out.  I laid them all out and let each child look at them and choose which ones were hot and which ones were cold.  Then we glued them in to their proper places on the board.

For the board I used black card stock.  At first I used chalk to write but then decided there would be too much touching and smearing so I typed, printed and cut out words.  I also used cheap, certificate frames and took the glass out.  I hung them up and put some pretty good double faced tape behind them to secure them to the wall but they can also be moved later on.


Friday, March 22, 2013

Starting Seeds

We have a plethora of seeds started for our garden here at the DC.  Not all of them will actually be in the garden that we will grow here.  Mainly because I have more windows that have wonderful sunlight, more so than at home since three sides of our home are porch covered.  So some of them will go to our home garden. 

The kids love to talk about our garden and making plans.  We talk during lunch time about which foods grow in the garden and it is funny because they will say things like hot dogs and popsicles grow in the garden which would I guess in a much more perfect world.  But talks like this lead to discussions of where other foods do come from and which foods are made from vegetables grown in the garden and they always know which vegetables came from our garden.
 
I wanted to involve the kids more this year in the garden from seed to table.  So we began by the children helping me make newspaper pots to begin some seeds in.  We actually started out with Roma tomato and Marigold seeds.  The most of our vegetables we will sow the seeds directly into the garden.  But our new window seed shelf is currently home to four trays of seedlings and soon-to-be seedlings. 
 
I also ran into a temporary problem at the beginning of our process, which I seem to run into often, of finding I left something at home that we need.  In this case it was the plastic wrap to go over the trays to use as makeshift greenhouses.  I looked around the rooms and was lucky to find two zip up plastic carrying cases that I had saved when I bought two sets of toys at the thrift store.  These are working like magic and are quickly turning into two of my favorite mini greenhouses.  They are like the zip ups that sheets or comforters come in.  It is a fantastic use for them. 
 
So here are a few pictures of our seed process that lets you see the kids spooning dirt into our pots.  It has become a daily event of checking to see which seeds have sprouted.  Especially for me... the one who waters the most.  If you have any questions on starting seeds for your own garden please shoot me an email!

Monday, March 18, 2013

A New Shelf

There are two windows on the back side of the day care that are facing West, just so that they get all the afternoon sun they can stand.  One of the windows is above our eating area and the other is in the main playroom.  Since it is almost time for us to begin sprouting seeds for our garden I felt we needed a good shelf in a sunny spot.  The playroom window seemed like the perfect window for plant life.  So I asked Shaun if he could cut us a piece of wood and I found a couple of brackets that I had left over from setting up the day care last Spring. 
 
In just a jiff we had a new shelf installed!  We put the brackets on each side of the window, screwed them to the wall and to the wooden shelf.  It is perfect.  It is high enough to keep little hands out of the pots but in the area where we can get them down for viewing anytime. And it is still low enough so they will clearly be able to see the plants grow (and low enough for me to whack my head!). 


I love, love, love this shelf! 

Monday, March 4, 2013

April Showers Bring May Flowers

Hooray!  Spring is almost here!  April showers may seem far off, this being early March, but it's really not.  I started out today wanting to have white, daisy like flowers on the wall around March on our wall.  I wound up with a few clovers around the month and making flowers and raindrops for the mirror in our eating area. 

I made a PDF template to share with you of simple flowers that I made from circles in three colors.  You can print them on white paper or card stock and simply cut them out.  I also used left over bits of green construction paper for the stems and folded a light blue piece and cut out rain drops. 

You can find the template for the flowers by clicking HERE.  Please let me know if you have trouble and I can email it to you. 

HAPPY SPRING!  It may still be cold but we are definately on the down hill slide from Winter!


Pay no attention to the girl behind the mirror!

Thursday, February 28, 2013

What We're Eating: Mac N Cheese

The easy recipe that I use for Mac-N-Cheese here at the day care is pretty high on the kid lunch list.
 
We have it with just about anything.  From fish sticks to chicken nuggets to turkey burgers, it serves as a quick side dish that they love.
 
 
Easy Kiddo Mac N Cheese
Serving Size: three kids and one adult
 
1/2 cup elbow macaroni
2 pieces sandwich cheese slices
1/8 cup milk
1 tsp butter
 
Boil macaroni in water until tender, about 12 minutes, drain.  Add cheese, milk and butter and stir.


Wow... that was tough!  You can't get much easier than that! 
If your cheese doesn't melt good I would try a different kind.  I use Nice N Cheesy which is the Kroger brand of Velveeta. 
 
I also add just a dab of butter to the water when boiling to keep the macaroni from sticking to the bottom.

Wednesday, February 27, 2013

Book of the Week

Our book of the week this week is...
 
TILLIE LAYS AN EGG
 
By: Terry Golson
 
 
The kids loved when I read this book.  We have a couple of chickens here on our farm so even if they don't have them at home they are exposed to them somewhat here.  The story of Tillie Lays and Egg was just precious I thought and you just fall in love with little Tillie.  She is adventurous and seems like you would never know what to expect from her.  The faces of these kids would light up, when I would turn each page, as they hunted for the spot where Tillie had laid her egg.  So cute.
 
 
Again, Again Rating: 10
 
 
And to explain the "Again, Again Rating", when I finish reading a book during story time and at the end I say "The End", the "Again, Again Rating" comes in depending on how many times the children ask me to read it Again and  Again!


Friday, February 22, 2013

Little Table Re-Do

This little table came from my Mom's house.  She has had it as long as I can remember.  Sadly, I did not take a picture of her lovely version of covering this table.  She had covered it in a country blue and pink tablecloth with a sweet ruffle all the way around.  The table had been stored in my parent's garage where for years my Dad has done wood working.  Needless to say it had some serious saw dust buried in the ruffle so it was best I took it apart outside.  What you see first is the before...before picture... before her redo.

I chose a vinyl table cloth that I bought on clearance for one dollar the the Wal-Mart a little while back.  I adore the cowboy theme it has.  I left the original "before" table the way it was and simply covered it with the new tablecloth.  I like using vinyl, picnic type tablecloths because it wipes easily when crayon marks and spills happen.  I laid out the tablecloth on the floor, print side down and turned my table upside down on top of it.  Next I came out about four inches all the way around and traced the shape of the table and cut it out.  Then I used a handy dandy staple gun and pulled and folded and stapled underneath the table to get it tight and cut away any excess.  Lastly I hammered in detail upholstery nails all the way around the edge just for looks and just because I already had them.  It turned out precious and fit in perfectly with the rest of the modge podge decor. 

Looks like she paid two dollars for it at some time.  Nice duct tape!

This table has a good wooden frame for stapling to.

Yee Ha!

Tacks in place.

Cute as a button.

I saved some of this tablecloth and made a matching changing table cover.  Also easy to wipe off!